


Pokémon Sword and Shield – Wild Area Guide

The Wild Area is a new, open-world area introduced in Sword and Shield. Much of the post-game grinding will take place here, as the Wild Area provides you with ways to obtain powerful Pokémon, valuable items, and Berries, which means that you’ll undoubtedly want to know your way around it as a competitive player!
This guide assumes you’ve already beaten the game, as certain features of the Wild Area will be locked off for players who have not yet done so. If you’re still in the middle of your playthrough, come back once you’ve become the Champion!
Table of Contents
- Raid Den Manipulation
-
Forcing Rare Den Spawns: Ditto Farming
Forcing Specific Pokémon Spawns: Get All The Raid Battles (and Watts!) You Want
- Miscellaneous Wild Area Tips
- Making Money: It’s Not Quite Pay Day
- Changing the Weather
- Evolutionary Stones: Fire, Thunder, Water, and More!
- Berries and Resetting Stats
The Basics of the Wild Area
What are Max Raid Battles? What’s the difference between red and purple dens? What do the star ratings on each raid mean? How do you join a random player’s Raid without getting thrown out with an error? How do you get Watts? If these are questions you’d like to see answered, keep reading! Otherwise, feel free to skip ahead.
Max Raid Battles
Max Raid Battles are the main attraction of the Wild Area. They’re easy to spot by the reddish (common) or purplish (rare) beams of light coming out of their corresponding den. When you interact with an active den, you’ll see a silhouette of the Pokémon inside, its typing, and its star rating (from 1 to 5). You may also summon Pokémon to inactive dens by using Wishing Pieces.
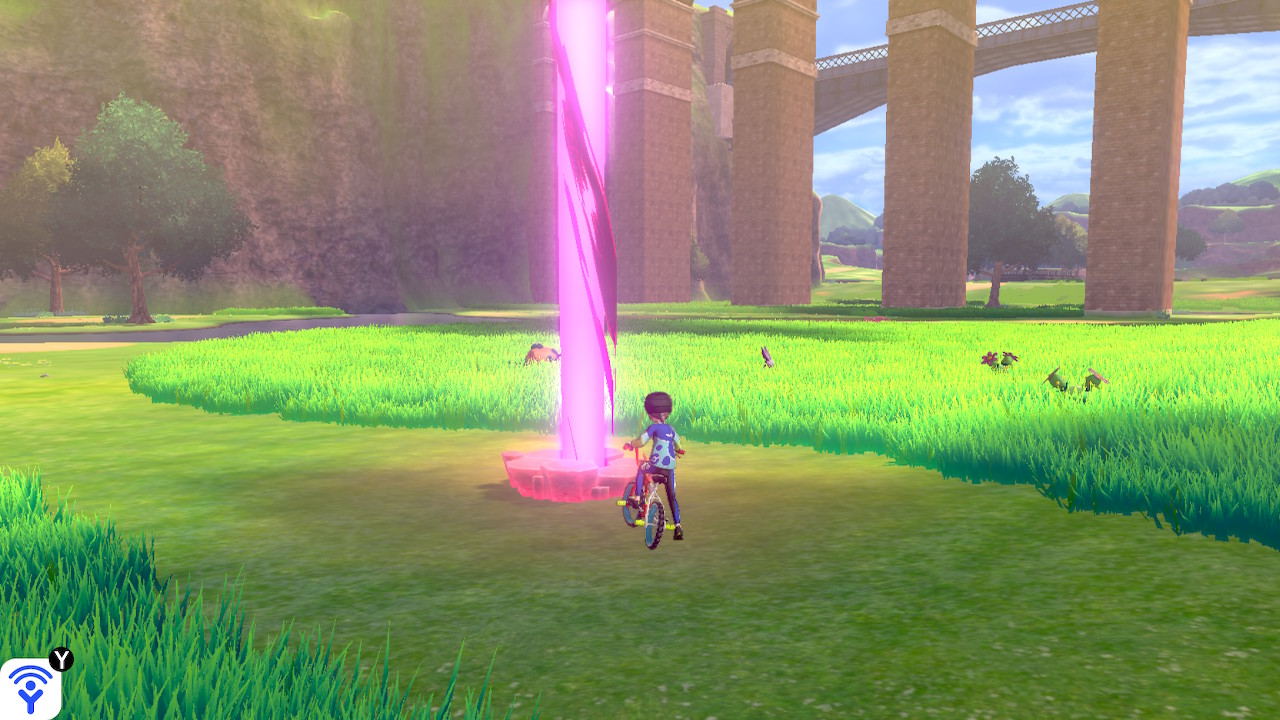
A purple den, pictured above, houses rarer Pokémon than the usual red dens.
The higher the star rating of a Pokémon, the more likely it is to have perfect IVs in multiple of its stats (you can expect 5-star Raids to house Pokémon with 4 perfect IVs), and the more likely it is to have its Hidden Ability (HA). The difficulty of the raid increases with the star rating, too! Raids are currently the only known way to obtain HAs, so they’re important for getting many key Abilities, such as Gothitelle’s Shadow Tag or Scrafty’s Intimidate.
In a Max Raid, you and three other players or NPCs will battle it out against a single, Dynamaxed (or Gigantamaxed) wild Pokémon. Only one of you will be able to Dynamax a Pokémon of your own, so choose wisely. Raid Pokémon behave as bosses of sorts, and can be quite tough to knock out!
At certain HP thresholds, the Raid Pokémon will put up a number of shields, which drastically reduce the damage they take. Shields are broken by damaging moves, with normal moves breaking through one shield and Max Moves breaking through two. Once you break through the shields, the Raid Pokémon’s defensive stats will be reduced, making it easier to defeat them. The Raid Pokémon may put up shields several times per battle, so you generally want to continue using damaging attacks throughout to deal with them. Further, Raid Pokémon may reset your stat buffs at certain points in the battle. For that reason, you’ll want to focus on dishing out damage rather than boosting!
Defeating a Raid Pokémon will give all participating players a chance to catch it (the stats, Ability, and Moves of the Pokémon will be the same for every player when caught). Each player gets to throw only one Poké Ball, so make sure to use Balls with higher catch rates!
Additionally, you will gain rewards in the form of EXP Candies, Dynamax Candies, TRs corresponding to the Pokémon you defeated, and high-value items upon completing a Max Raid, all of which you’ll want to make use of in order to create your perfect VGC team.
Raiding Tips and Tricks
- Raid Pokémon are immune to moves such as Destiny Bond, Perish Song, and OHKO moves. You can’t cheese them with instant knockouts!
- Status or secondary effects such as stat drops will not activate if they hit a Raid Pokémon’s shield; for that reason, it can be a good idea to start Raid Battles by having the fastest Pokémon on the field apply a helpful status effect, such as using Nuzzle to induce Paralysis.
- Multi-hit moves will only break one of a Raid Pokémon’s shields, but if the Raid Pokémon has just one shield left, then the first hit will break the shield and the rest of the hits will do damage unaffected by the shields.
- Raid dens normally reset once per day, but if you clear out every Raid on the map, the game will generate a new set of raids for you to take on!
- Dens can spawn with different colors: red and purple. Purple dens house rarer Pokémon, and only one purple den can be active on the map at a time. This means that you need to clear out a purple den before you’re able to spawn another one.
- Due to the spotty, slow-to-update stamp system, raiding is best done with people on your Friend List: the stamps showing your friends’ Raids should always appear in a timely fashion, making them much easier to join. You can also set a code for the Raid using the + button to ensure only your friends are able to join.
- If you nevertheless prefer to raid with random players online, you can force the stamps to update by doing any other online activity, such as trading League Cards with someone or doing a Surprise Trade. Once the stamps update, try to find a Raid within the first 10 stamps on the list: these stamps are most likely to be fresh, which gives you better chances of being able to actually participate in the Raid.
Watts
Watts are the currency of the Wild Area, and can be exchanged for a variety of items. Unfortunately, there aren’t many reliable ways to obtain Watts: they can be obtained from defeating Brilliant Pokémon (Pokémon surrounded with a yellow glow in the overworld), or from participating in the Rotom Rally (though this method is too slow to really be worth it), but the easiest way to farm Watts is to visit dens.
Each active den you visit will grant you a big bonus of 2000 Watts once you’re in the post-game, and inactive dens will still net you a decent 200 Watts. The best strategy for farming Watts is clearing out all of your dens to force new Max Raids to spawn, as this will allow you to roam the map collecting Watts from dens again.
The above assumes you’re playing the game as the developers intended, of course. If you’d rather use an easy-to-perform exploit to collect Watts, take a look at the Forcing Specific Pokémon Spawns section!
Regardless of which method you choose, you’ll want to collect a fair few Watts for the next section of this guide, as it will require you to use Wishing Pieces, which cost 3000 Watts each.
Raid Den Manipulation
Pokémon players tend to enjoy finding ways to game the system, so to speak, and Raids are no different. As luck would have it, there’s ways to manipulate Raid spawns!
Forcing Rare Den Spawns: Ditto Farming
Since Ditto is able to breed with just about all Pokémon, it’s a must-have for any aspiring Pokémon breeder. As in previous generations, the parents will pass down some of their IVs to their offspring, which means that having a Ditto with good IVs will make breeding considerably easier for you. Thankfully, it turns out Ditto spawns in a certain, specific den in the Wild Area, and players have found a way to ensure the den will always spawn a Ditto, as opposed to another Pokémon.
Ditto will only spawn if the den is purple (in other words, it’s a rare spawn). Buy a fair few Wishing Pieces, as you’ll be using them here.
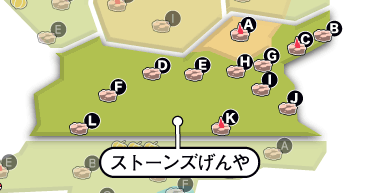
The den marked J on the above map is the Ditto den. If you go north from the Daycare, pass by den A, and keep going past the bridge, it should be the next den you see on your right! [Map Source]
The Ditto den is located in the Stony Wilderness to the north of the Daycare. If you’re having trouble finding it, Serebii has a picture of the area. Once there, go into the game options and set the text speed to slow. If the den is currently active, clear out the Max Raid there first. Save the game. Throw a Wishing Piece into the den to force a new Max Raid to spawn: before the game is automatically saved, quickly hit the Home button to check whether you get a red or purple den (the slow text speed will help you hit Home in time). If the beam is red, it’s not a Ditto, so restart the game and try again; if it’s bigger and purplish in color, bingo! You’ve found a Ditto!
The Ditto in the den will be guaranteed to have 3 – 4 perfect IVs, depending on star rating. If you get lucky, you may even be able to catch a coveted 5 IV Ditto! If not, there’s no need to worry. You can repeat this process as many times as you want, provided you have the Wishing Pieces needed.
Forcing Specific Pokémon Spawns: Get All The Raid Battles (and Watts!) You Want
Are you looking to catch a specific, rare Pokémon for your team? Or perhaps you’re just hunting for an elusive HA? If so, there’s an easy way to get the Pokémon you want to spawn! The following is also by far the best way to farm Watts.
As with the previous section, you’ll want to use a Wishing Piece here. This is very important: if you do not spawn the raid with a Wishing Piece, the beams will change places each time the date changes. If you spawn a raid with a Wishing Piece, however, its location will remain static.
If you’re looking to nab a specific Pokémon, go to Serebii’s Max Raid Den list and figure out which den your Pokémon spawns in. You’ll also want to check if the Pokémon spawns in red (common) or purple (rare) dens; if it spawns only in purple dens, then refer to the Forcing Rare Den Spawns section. Throw in your Wishing Piece and ensure the beam has your desired rarity.
Here’s how the trick works: first, make sure you’re offline before continuing. Next, interact with the den and click the Invite Others option. As the timer starts ticking down, use the Home button to access the System Settings. From here, go to the System tab, then to Date and Time. If your date is synced via the Internet, turn the option off before proceeding. Change the date to a different day—the day you choose doesn’t matter (for simplicity’s sake, I recommend simply setting the date to the next day).
Go back to the game and Quit looking for other players. With the date changed, the raid spawn will update, but the rarity of the den will stay the same as it was. You’ve successfully tricked the game into believing a day or more has passed, which causes Raid dens to update and yield Watts once more, Berries to regrow on trees, and PokéJobs to finish.
When you interact with the den again, you’ll get a nice bonus of 2000 Watts, and you will also find that the Pokémon in it has changed. Repeat the process as many times as needed until you find your desired Pokémon (or simply to farm some Watts). Once you’re finished, you can go online again and invite your friends to the Raid!
Miscellaneous Wild Area Tips
We’ve gone over Raids in great detail, but there’s more to the Wild Area than that: it’s also a great source of money and non-Raid wild Pokémon, and it’s the only place in the game where you can find unlimited Evolutionary Stones and Berries. Read on to learn more Wild Area secrets!
Making Money: It’s Not Quite Pay Day
Sword and Shield has made money a more important resource than previously for competitive players, as Vitamins are now the easiest way to EV train your Pokémon. While Gigantamax Meowth’s G-Max Move is many players’ go-to method for money farming, the Wild Area has a plethora of other options to get rich quick.
The fastest way of making money in the game will have you converting Watts into PokéDollars, which means you’ll likely want to use the Watts farming trick described in the Forcing Specific Pokémon Spawns section. Doing this lets you get roughly 6000 Watts per minute, which you can potentially convert to 90 000 PokéDollars! Once you’ve amassed a good amount of Watts, find a vendor in the Wild Area that sells non-standard Poké Balls in exchange for Watts.
The best Poké Balls to get are Luxury Balls for 100 Watt, as these have an exchange rate of 1 Watt for 15 PokéDollars. If no vendor happens to be selling them that day, then the 50 Watt Poké Balls such as Nest Balls or Dive Balls give you a decent exchange rate of 1 Watt for 10 PokéDollars, although you’d generally be better off changing the date by using the aforementioned trick until you get a vendor that sells Luxury Balls. Note: if the vendors are selling Poké Balls for 20 Watts, the exchange rate won’t be as good. Aim for the Luxury Balls! (Thanks to Kairoshiii for this tip!)
One of the vendors can be found by a tree near the Lake of Outrage; another one can be found by hugging the wall as you go left from the Meetup Spot until you spot a pair of Berry Trees, and you’ll find yet another one right next to the Daycare. The last two vendors are by the entrances to Hammerlocke and Motostoke.
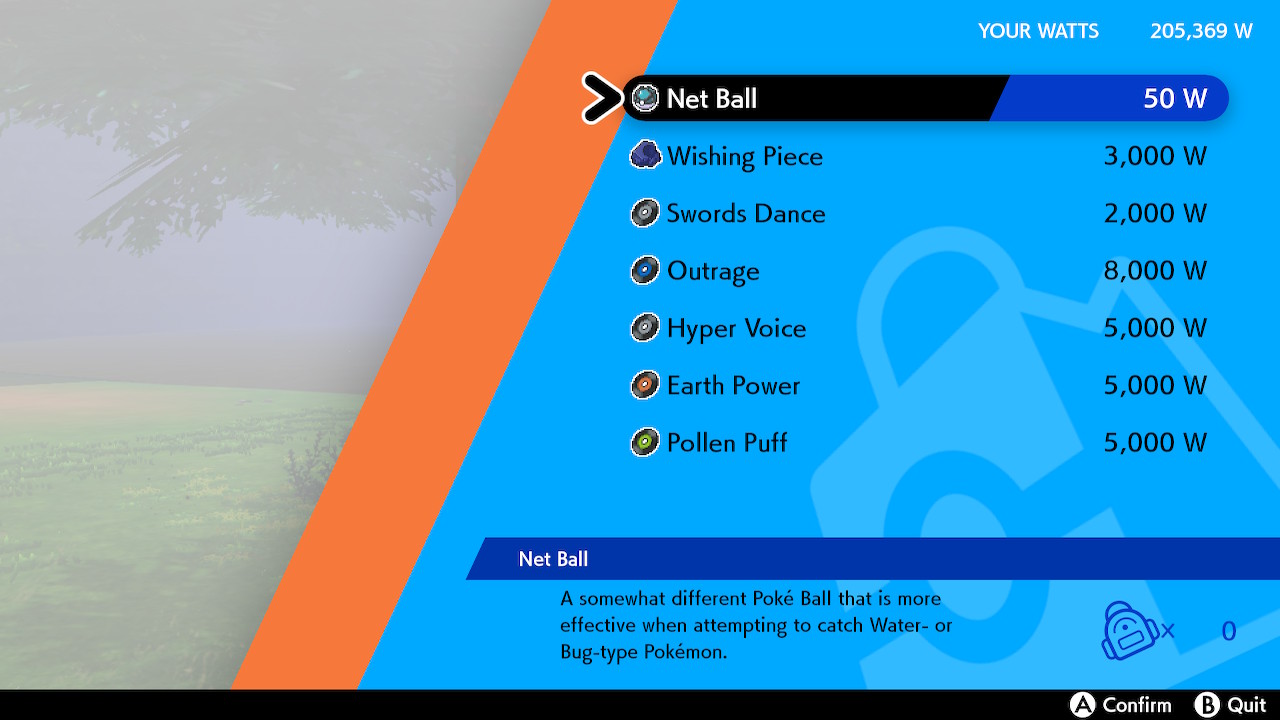
That Net Ball is a decent deal!
If you’d rather not do the above, here are some alternative ways to make money:
- Do Max Raids. They’ll drop items which can usually be sold at a high price to shops!
- Battle Breeders with an Amulet Coin Pokémon. Breeders are trainers who spawn randomly in the Wild Area, and give 24,000 PokeDollars upon defeat. With the Amulet Coin, that amount is doubled to 48,000!
- Pick up sparkling items off the ground. Each time you visit the Wild Area, items will spawn randomly, and are symbolized by sparkles on the ground or in the water—some of the items you can pick up sell for a lot! (When selling items, make sure to check both the valuables tab and the ingredients tab. Pungent Roots and Fancy Apples are also a decent source of money!)
- Pay Fishers 100 Watts to give you valuable items. The fishers spawn randomly near lakes and ponds in the Wild Area, and will provide you with Pearls and the like in exchange for Watts. (You can do the same with Hikers, but they will give you Candies instead.)
- Once per day, you can visit the trader in Stow-on-Side to sell one of the valuables you’ve found in the Wild Area. He’ll only buy one item, but he’ll buy it at an increased price!
Changing the Weather
The weather in the Wild Area changes every day, but if you’re in need of a specific kind of weather—say, because some Pokémon only spawn when it’s sunny or hailing—there’s a trick you can use that will cause the entirety of the Wild Area to have the same weather. Simply open your System Settings, go to the System tab, and click on Date and Time. Entering one of the following dates will trigger certain weathers:
- Feb. 1, 2020: Hailing
- March 1, 2020: Overcast
- April 1, 2020: Sandstorm
- May 1, 2020: Clear
- June 1, 2020: Foggy
- July 1, 2020: Sunny
- Oct. 1, 2020: Raining
- Nov. 1, 2020: Thunderstorms
- Dec. 1, 2020: Snowing
Evolutionary Stones: Fire, Thunder, Water, and More!
The Wild Area is the only renewable resource of Evolutionary Stones in the game, which you may or may not need to complete your team. If you’re looking for such a Stone, then an area of interest to you would be the stone formation surrounding a den in the Lake of Outrage, which players on occasion refer to as the “Eevee Stonehenge”. If you investigate the area around the rock pillars closely, you should be able to find some Evolutionary Stones! The Stones you’ll find each day are random, but they all have a chance to spawn there.
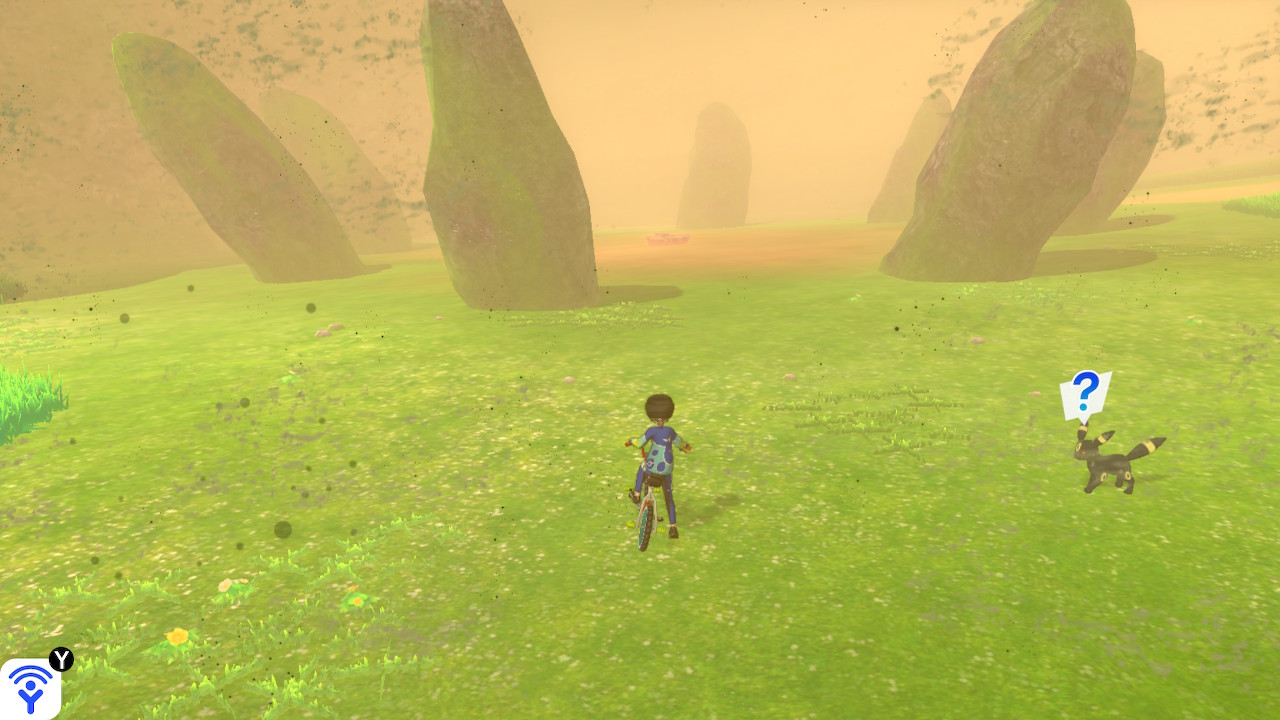
An eeveelution will always spawn next to the rock pillars. They’re hard to miss!
Another option is enlisting the help of the Digging Duo, located near the Daycare. For 500 Watts, they’ll dig up rare or otherwise valuable items for you. One is more likely to dig up a plethora of items, but at the cost of the items being less rare; the other is more likely to dig up rare treasures, but will get you fewer items overall. Regardless, the results of their digging sessions are completely random and can not be savescummed, so this is more of a last resort option.
Berries and Resetting Stats
The Wild Area is the main source of Berries in Sword and Shield—unfortunately, that means you can no longer plant them. Berries have a wide variety of effects, with some being more important for competitive play than others, but for the purposes of this guide, I’d like to focus on a particular kind of Berry: EV-reducing Berries. They refer to the following six Berries:
- Pomeg Berry: Lowers a Pokémon’s HP by 10 EVs.
- Kelpsy Berry: Lowers a Pokémon’s Attack by 10 EVs.
- Qualot Berry: Lowers a Pokémon’s Defense by 10 EVs.
- Hondew Berry: Lowers a Pokémon’s Special Attack by 10 EVs.
- Grepa Berry: Lowers a Pokémon’s Special Defense by 10 EVs.
- Tamato Berry: Lowers a Pokémon’s Speed by 10 EVs.
Since these Berries are the only way to reduce your Pokémon’s EVs, you’ll want to amass a decent amount of them.
The Wild Area is one of the places where you’ll find Berry trees, which you can shake once per day to cause their Berries to drop to the ground. It’s worth noting that performing the trick described in the Forcing Specific Pokémon Spawns section will reset the Berry Trees found in the Wild Area, so feel free to make use of this fact!
When shaking a Berry Tree, it’s important to remember not to shake it too much! If you do, a wild Pokémon will appear to steal some of the Berries. You’ll know when to stop shaking by looking carefully at the animation of the Berry Tree: the more it rustles, the more likely you are to be attacked by a Pokémon the next time you shake it. If you notice a lot of rustling, you can generally shake the tree just one more time before it’s time to stop!
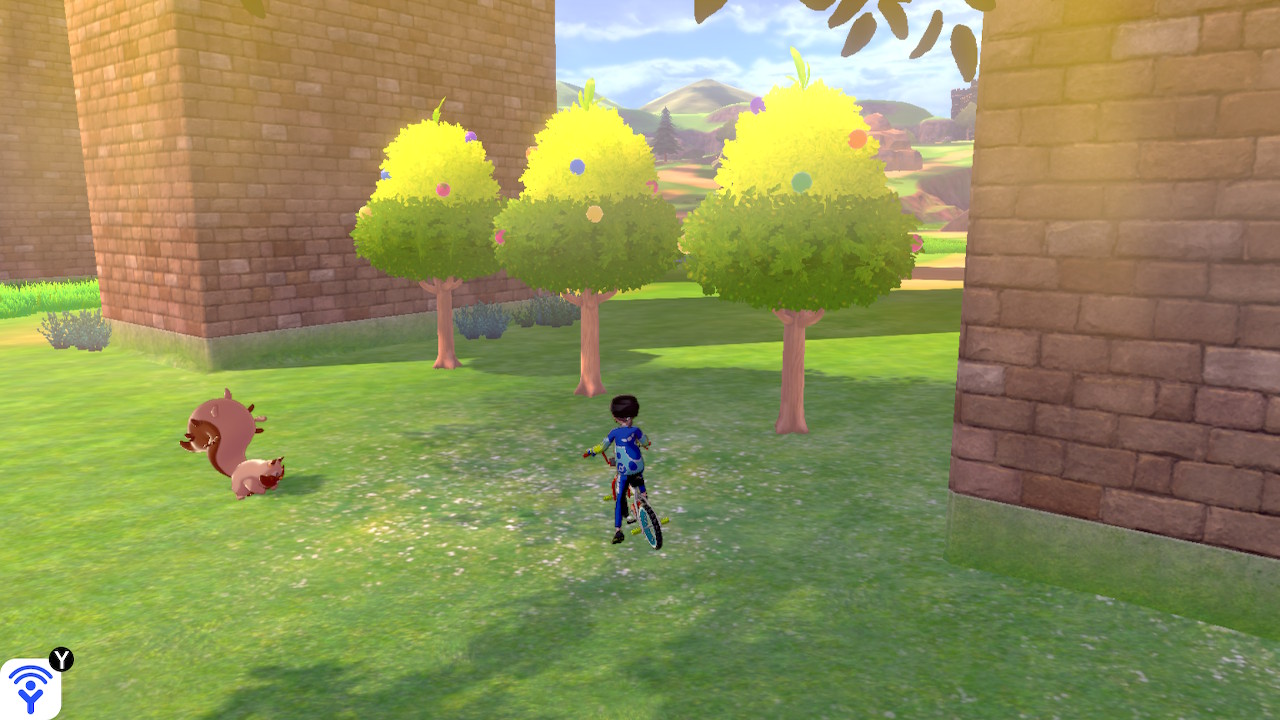
These EV-reducing Berry Trees are always guarded by a static Greedent spawn.
There is a specific set of trees you’ll want to visit daily. In Bridge Field (to the northwest of the Daycare, underneath the bridge) you’ll find the above three trees. The leftmost tree has Hondew and Grepa Berries; the middle tree has Pomeg and Tamato Berries; and the rightmost has Kelpsy and Qualot Berries. They may also drop other Berries in addition to these, but they’re one of the more convenient sources of EV-reducing Berries. (Thanks to Pd0nZ for helping confirm this!)
If you’ve already visited these, it could be worthwhile to check other trees found in the following areas: Giant’s Mirror, Motostoke Riverbank, and Hammerlocke Hills. The tree by the pond in Giant’s Mirror is of particular interest, as it will only drop EV-reducing Berries.