


Adding a Little Jelli – A 9th Place Dallas Regionals Report
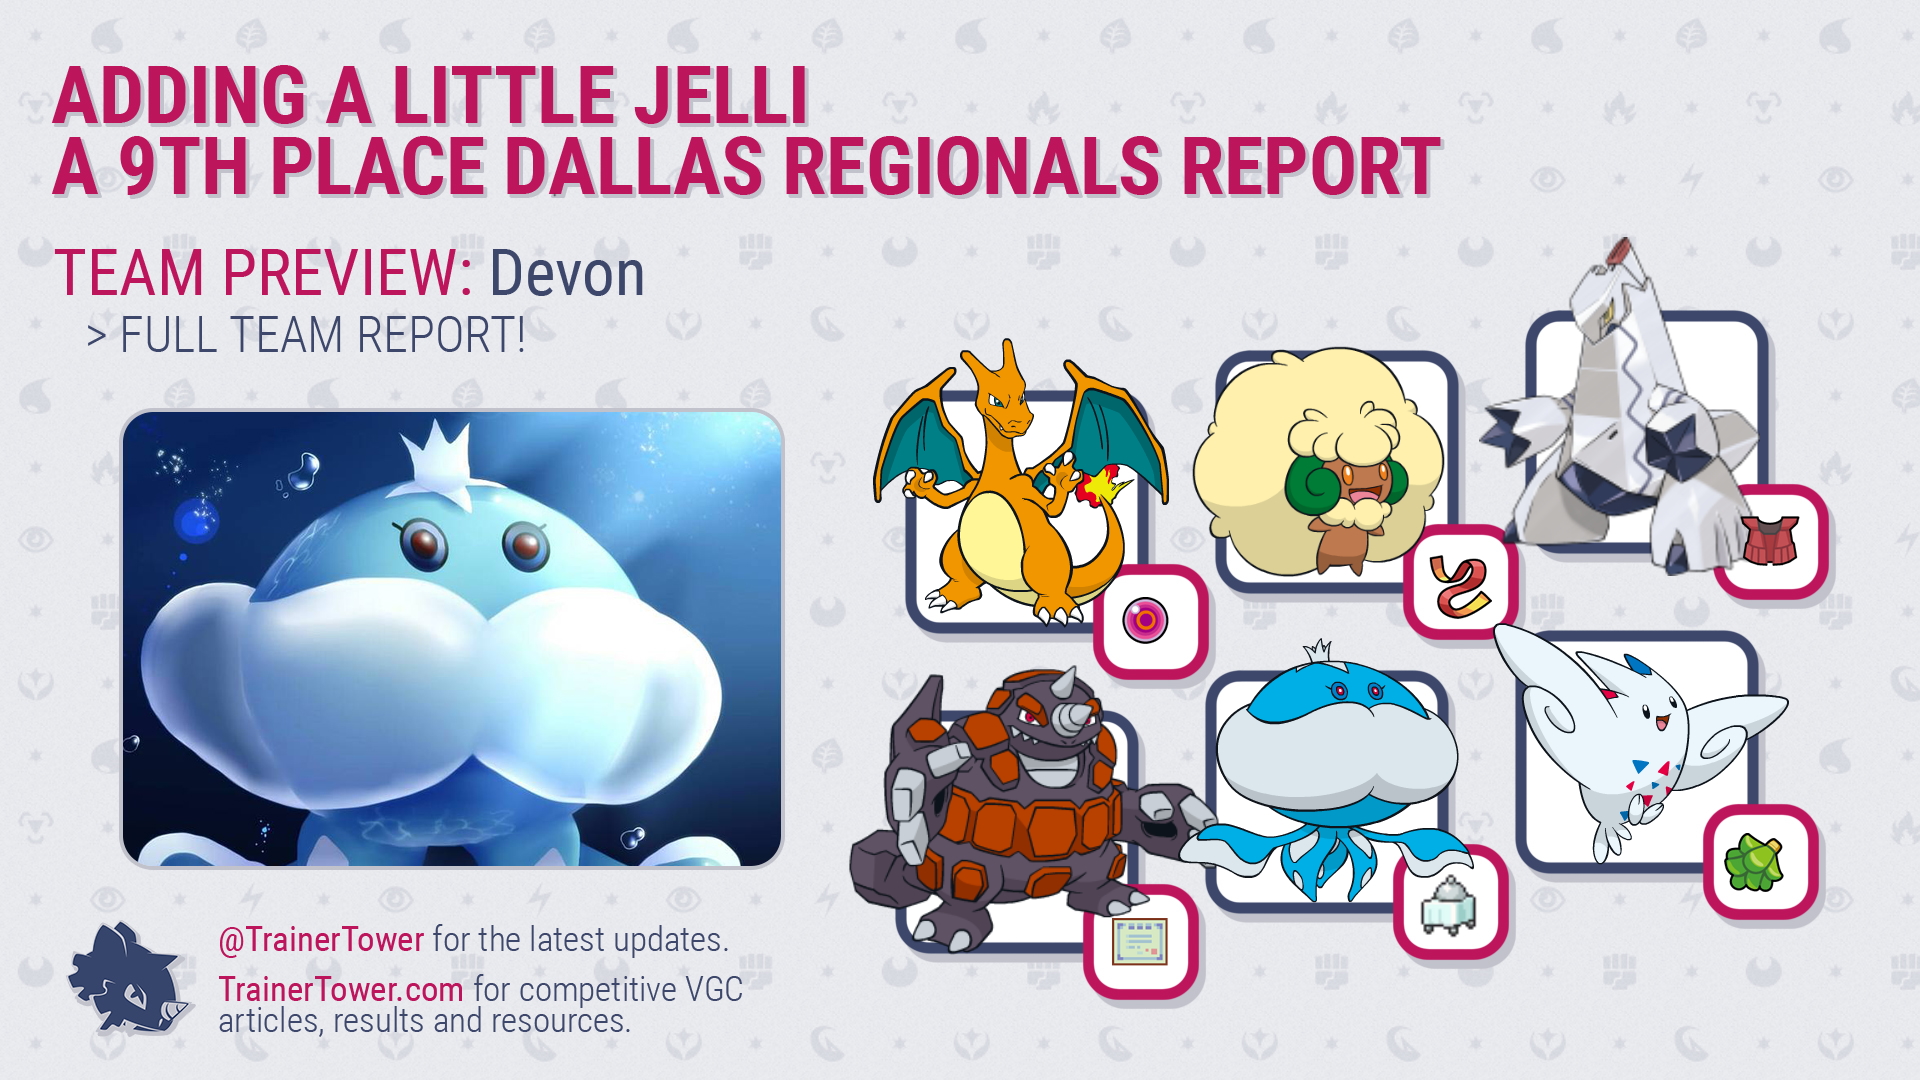
Hello, my name is Devon, and I am a player from the Eastern US who some may recognize as Teenspirit (@TeenspiritVGC). I started playing competitive Pokémon in 2015, when a Regional was held near my hometown in Pennsylvania. I did not perform particularly well at that event (I went a solid 4-5), but that experience sparked a passion I have kept for many years. Due to limitations on my time and resources, I have only attended a few events through the years, but I intend to make my mark in VGC 2020!
Achievements
- The team peaked in the low 1700s on SD (top 50) prior to Dallas
- Top 16 Dallas Regionals
The Team
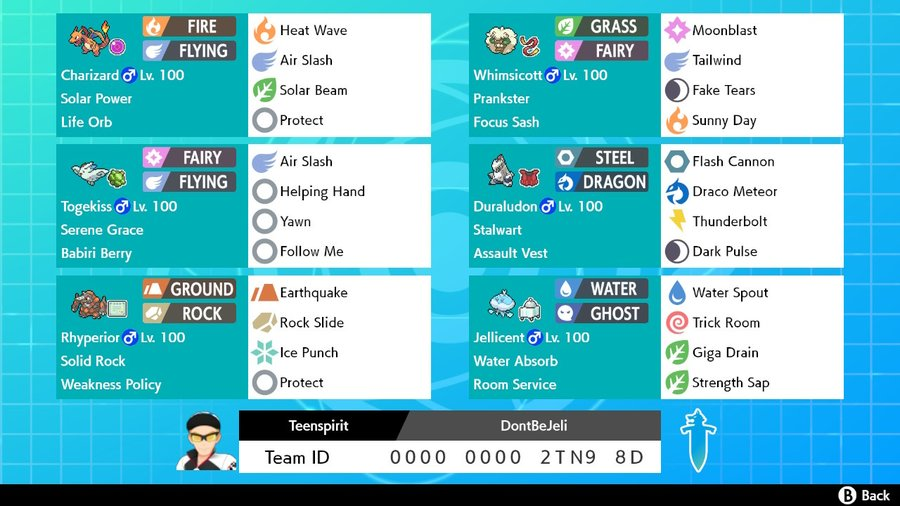

Charizard @ Life Orb
Ability: Solar Power
Level: 50
EVs: 4 HP / 252 SpA / 252 Spe
Timid Nature
IVs: 0 Atk
– Heat Wave
– Solar Beam
– Air Slash
– Protect
Aaron Traylor (@TBFUnreality) may have used Gigantamax Charizard on his Dallas-winning team, but I opted for a Dynamax Charizard with Life Orb to maximize its offensive power. While the Gigantamax form does offer the boon of residual damage, I preferred the sheer and immediate damage of Dynamax Charizard with Solar Power in testing. I also liked the option of reducing Water damage and setting up the Sun with Max Flare, or using Fake Tears without the Sun support for surprise KOs. Though many Charizard opt for Blast Burn to allow for an incredible 150 BP Max Flare, I occasionally needed Heat Wave for spread Fire damage through redirection.
- 252+ SpA Life Orb Duraludon Max Lightning (140 BP) vs. 4 HP / 0 SpD Charizard: 247-291 (80.1 – 94.4%) — guaranteed 2HKO
- 252 SpA Life Orb Solar Power Charizard Max Flare (130 BP) vs. 252 HP / 0 SpD Duraludon (Dynamax) in Sun: 491-578 (138.7 – 163.2%) — guaranteed OHKO
- 252 SpA Life Orb Solar Power Charizard Max Airstream (130 BP) vs. 252 HP / 0 SpD Arcanine in Sun: 230-270 (116.7 – 137%) — guaranteed OHKO

Whimsicott @ Focus Sash
Ability: Prankster
Level: 50
EVs: 4 HP / 252 SpA / 252 Spe
Timid Nature
IVs: 0 Atk
– Tailwind
– Moonblast
– Fake Tears
– Sunny Day
Whimsicott offers some of the best support in the game and is a fantastic partner for both Charizard and Duraludon. Fake Tears paired with Duraludon or Charizard sweeps through unprepared teams. Sunny Day augments Charizard’s power in addition to neutering Excadrill’s Sand Rush or Tyranitar’s Sp. Def boost in Sand.

Duraludon @ Assault Vest
Ability: Stalwart
Level: 50
EVs: 204 HP / 236 SpA / 68 Spe
Modest Nature
– Flash Cannon
– Draco Meteor
– Thunderbolt
– Dark Pulse
Duraludon was the MVP of the team and came to nearly every set I played. Though Assault Vest is a less popular choice for Duraludon, it was a huge factor in many of my matches. The added bulk allows Duraludon to survive strong special attacks, even with Fake Tears support! Though the fast Life Orb set is a huge threat when Dynamaxed, I found it underwhelming in situations where Charizard or Rhyperior were the preferred Dynamax options. The Life Orb set on a regular Duraludon seemed frail and dependent on winning Speed ties with opposing threats, but the AV set felt more versatile. This spread was designed specifically to threaten opposing Dragapult + Togekiss cores. The Sp. Atk investment allows me to OHKO Dragapult after Life Orb recoil or Togekiss through Babiri Berry with Fake Tears support. The Speed stat slightly outpaces opposing Dragapult in Tailwind or neutral Nature Tyranitar outside of Tailwind.
- 236+ SpA Duraludon Max Wyrmwind (140 BP) vs. 4 HP / 0 SpD Dragapult (Dynamax): 312-368 (95.1 – 112.1%) — 68.8% chance to OHKO
- 236+ SpA Duraludon Max Steelspike (130 BP) vs. -2 236 HP / 0 SpD Babiri Berry Togekiss: 204-241 (107.3 – 126.8%) — guaranteed OHKO
- 252 SpA Life Orb Charizard Max Flare (130 BP) vs. -2 204 HP / 0 SpD Assault Vest Duraludon (Dynamax): 296-348 (86.5 – 101.7%) — 12.5% chance to OHKO
- 252+ SpA Duraludon Max Wyrmwind (140 BP) vs. -2 204 HP / 0 SpD Assault Vest Duraludon (Dynamax): 286-337 (83.6 – 98.5%) — guaranteed 2HKO
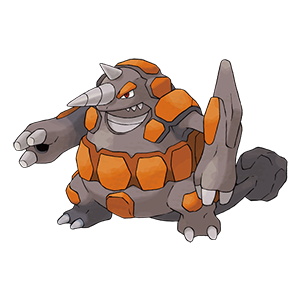
Rhyperior @ Weakness Policy
Ability: Solid Rock
Level: 50
EVs: 140 HP / 236 Atk / 20 Def / 108 SpD
Brave Nature
IVs: 0 Spe
– Earthquake
– Rock Slide
– Protect
– Ice Punch
Rhyperior is a fantastic Trick Room sweeper with incredible bulk, strong Max Moves, and an Ability that perfectly synergizes with Weakness Policy and Dynamax. The set is primarily focused on beating Excadrill—I can OHKO even Dynamax Excadrill with a Max Quake and survive two Max Moves in return if needed. The remainder of the EVs were dumped into Sp. Def to capitalize on the Sand and Max Quake boosts. I opted for Earthquake since I can avoid damage with Togekiss or Charizard as partners. Ice Punch replaced the usual Fire Punch or Superpower because I needed a way of removing opposing Dynamaxed Rotom-C without weakening Jellicent’s Water Spout.
- 236+ Atk Rhyperior Max Quake (130 BP) vs. 4 HP / 0 Def Excadrill (Dynamax): 384-452 (103.2 – 121.5%) — guaranteed OHKO
- +2 236+ Atk Rhyperior Max Hailstorm (130 BP) vs. 252 HP / 0 Def Rotom-C (Dynamax): 322-380 (102.5 – 121%) — guaranteed OHKO
- 252 Atk Life Orb Excadrill Max Steelspike (130 BP) vs. 140 HP / 20 Def Solid Rock Rhyperior: 175-207 (42 – 49.7%) — guaranteed 3HKO

Jellicent @ Room Service
Ability: Water Absorb
Level: 50
EVs: 204 HP / 4 Atk / 100 Def / 164 SpA / 36 SpD
Sassy Nature
IVs: 0 Atk / 0 Spe
– Water Spout
– Giga Drain
– Trick Room
– Strength Sap
Jellicent was the defensive glue holding the team together. After watching Rhyperior-based hard Trick Room teams dominate the early format and perform well in Bochum, I wanted some countermeasures to opposing Rhyperior. Room Service allows Jellicent to underspeed all Rhyperior in Trick Room and Strength Sap their power before they become too threatening. Additionally, I can OHKO opposing Rhyperior with a combination of Jellicent’s Water Spout and Max Quake from my own Rhyperior. Since Jellicent underspeeds my minimum Speed Rhyperior in Trick Room, I can also self-proc Weakness Policy with Giga Drain for devastating damage. With redirection support from Togekiss, I didn’t consider a resist Berry, and I think Room Service afforded the team an effective strategy for counteracting Rhyperior.
- 252+ SpA Life Orb Duraludon Max Lightning (130 BP) vs. 204 HP / 36+ SpD Jellicent: 169-200 (84 – 99.5%) — guaranteed 2HKO
- 252+ Atk Tyranitar Crunch vs. 204 HP / 100 Def Jellicent: 180-212 (89.5 – 105.4%) — 31.3% chance to OHKO
- 164 SpA Jellicent Water Spout (150 BP) vs. 44 HP / 196 SpD Solid Rock Rhyperior (Dynamax): 243-288 (61.9 – 73.4%) — guaranteed 2HKO

Togekiss @ Babiri Berry
Ability: Serene Grace
Level: 50
EVs: 236 HP / 196 Def / 4 SpA / 12 SpD / 60 Spe
Bold Nature
IVs: 0 Atk
– Follow Me
– Yawn
– Helping Hand
– Air Slash
Though many players at Dallas chose a more offensive Togekiss, I preferred a support set to help Jellicent guarantee Trick Room and to protect Duraludon. Yawn is an incredible move with the new Dynamax mechanics—opponents are pressured to either (1) switch and give me a free turn or (2) stay in and give me free turns in the future. Helping Hand was a useful move to punish opposing Fake Out.
- 252 Atk Tyranitar Rock Slide vs. 236 HP / 196+ Def Togekiss: 78-92 (41 – 48.4%) — 6.3% chance to 2HKO after sandstorm damage
- 252 Atk Life Orb Excadrill Max Steelspike (130 BP) vs. 236 HP / 196+ Def Babiri Berry Togekiss: 117-138 (61.5 – 72.6%) — guaranteed 2HKO
Team Preview
The first step in team preview is to determine the most effective Dynamax user between Charizard, Duraludon, and Rhyperior. Afterwards, I usually pick a speed control option (Whimsicott or Jellicent) and Togekiss. Most opponents feel pressured by the Duraludon/Charizard + Fake Tears combo, so consider how they might react and plan accordingly.
Common Leads


If the opponent does not have Fake Out, Charizard and Whimsicott is probably a good lead to sweep. Together, they offer unparalleled damage output. Just make sure the opposing team’s Dynamax user cannot survive a double-up and KO in return (I’m looking at you, Assault Vest Mudsdale).

I usually lead Duraludon when my opponent is likely to bring a redirection user or if they may have difficulty contending with Duraludon’s bulk and power once Dynamaxed. Again, beware of Fake Out users and opposing Excadrill.

This lead is a good response to opponents with a strong Fake Out option. Togekiss can apply Sleep pressure or redirect damage away from Duraludon while benefiting from Defense boosts or the opponent’s Attack drops. I also like to click Helping Hand turn one in front of Grimmsnarl for a surprise KO with Max Steelspike.

This lead is very effective when you want to sweep with Rhyperior in the mid-game. The opponent has to choose between KOing Togekiss (thus allowing Rhyperior free Trick Room turns) or pressuring the opponent with Helping Hand + Water Spout or Air Slash flinches.
Core Combinations
These Pokémon form an offensive core which threatens KOs on the entire meta. However, they do have limitations and can feel fragile under certain conditions (e.g., opposing Durant). Avoid status and being Snarled when possible. Though Charizard has decent bulk, remember that a significant portion of your health will be sacrificed between Life Orb and Solar Power recoil in the sun. Therefore, it is important to use this core to overwhelm the opponent in a few turns.

These pieces form a devastating Trick Room core that is very likely to succeed if you use Rhyperior effectively and take KO’s each turn of Trick Room. Many teams lack a solid response to Rhyperior, so make sure you don’t allow it to take unnecessary damage or status unless it is absolutely necessary. Togekiss can pivot in and out depending on the current board state; a late game Follow Me to clean up the board once Trick Room expires may be invaluable.
Team Matchups


Bring: Duraludon + Togekiss w/ Rhyperior and Jellicent
If the opponent leads with Togekiss, it is usually wise to remove it from play immediately. The biggest threat to this team is a well-played Excadrill, so focus on surviving its Dynamax turns without losing too many resources. Jellicent and Rhyperior can clean up the end game with relative ease.
 (Sand)
Bring: Togekiss + Rhyperior / Duraludon w/ Jellicent
Use the threat of Rhyperior or Duraludon to take early KOs with support from Togekiss. Trick Room can be set up with relative ease UNLESS the opponent has a way of handling a Togekiss + Jellicent lead. Jellicent is valuable in this matchup if you get safely into Trick Room; Strength Sap can help mitigate the opposition’s strong physical attackers. In a BO3 situation, consider adjusting by bringing Charizard if you believe you can maintain the Speed advantage.


 (Hard TR)
Bring: Duraludon + Jellicent / Togekiss w/Rhyperior
Dynamax Duraludon and Max Lightning immediately to prevent Sleep shenanigans or Max Darkness and Water Spout for massive damage. Room Service allows Jellicent to underspeed Rhyperior in Trick Room, which is the most potent threat on these teams. Don’t activate the opposing Rhyperior’s Weakness Policy unless you are taking the KO.


Charizard + Togekiss / Whimsicott w/ Rhyperior + Jellicent
Charizard is a fantastic pick in this matchup if you can remove the Grimmsnarl early. Once it is gone, Charizard typically does enough damage to allow for Jellicent and Rhyperior to win in the end game. Beware of Mudsdale’s bulk; to OHKO Assault Vest Dynamax Mudsdale, you need Fake Tears and Sunny Day active at the same time.
Rundown of Tournament
Going into Dallas, I felt confident in my team selection but less confident in my play. After all, I had not attended an IRL tournament since 2018. With an incredibly long day ahead, I found my round one pairing with a sense of optimism. If I could get *some* Championship Points, I mused, I would be happy…
R1: Zhe Zhang (WW)


Game 1: Zhe had a Trick Room team that guaranteed his Speed control with redirection from Clefable and Babiri Berry Mimikyu. I was able to navigate the Trick Room with relative ease using Togekiss and Jellicent, and I had a decisive victory a few turns later.
Game 2: Zhe switched to an exclusive Snorlax-setup mode. I played poorly around his supportive options and nearly lost in the end game. I needed to flinch his Snorlax a few times to guarantee the win, but I won when he forfeited prematurely.
R2: Joshua Mecham (WLW)


Game 1: Josh’s team featured a hard stop to my Whimsicott with Gothitelle and Fake Out, so I led Duraludon+Togekiss to pressure him immediately. He Faked Out Togekiss as I went for Helping Hand Max Darkness into his Excadrill. The Sp. Def drops added up so that I was able to clutch the game once Excadrill was KOed.
Game 2: Josh Dynamaxed his Rotom-W early on which pressured my Togekiss + Jellicent lead immensely. He also brought Mimikyu, and, fearing the Trick Room reversal, I didn’t go for Trick Room during a pivotal turn. He never went for Trick Room and swept me in a few turns (though, I do remember absorbing a Max Lightning and a Max Geyser with Rhyperior and Jellicent, respectively!)
Game 3: I assumed Josh did not have Trick Room on his Mimikyu, so I went for TR and immediately pressured his team with boosted Rhyperior (thanks to self-proc Giga Drain). Through some smart switching, Josh outlasted my Trick Room and faced down my Rhyperior with a +1 Sp. Def boost as Sand ended. His Rotom-W was in Rock Slide range, but I needed to connect. To my (and his) great surprise, Hydro Pump connected and KOed my Rhyperior, no crit needed. We both assumed it was a high roll in his favor, and, without knowing his exact set, I assume that was the case. I took my first set loss, but I felt reassured that I was playing to the best of my abilities.
R3: Becca Franklin (WLW)


![]()
Game 1: Becca had a wild Goodra + Alcremie strategy involving Decorate that was surprisingly potent. Goodra effectively walled my Charizard mode and was able to survive a boosted attack from Rhyperior when Dynamaxed. In the final turns, I was left with only Togekiss versus a +2 Goodra. I was sure to lose without blessings from Serene Grace Air Slash Togekiss. Luckily, Togekiss delivered, and I won the game.
Game 2 & 3: Becca recovered well in game two and took a decisive victory, but I was able to clutch a win in game three using my Assault Vest Duraludon with Fake Tears support.
R4: Alexander Mak (WLW)


Game 1: Alex had a scary team, but made the mistake of leading Gyarados + Raichu into my Duraludon, who freely unleashed Max Lightning onto Gyarados. He had trouble dealing with Duraludon and lost to Jellicent in the endgame.
Game 2: Alex played well and was able to (with a few crits) clutch the win. His Jellicent shined and gave my team trouble after he KO’d Duraludon.
Game 3: Alex led Raichu and his Choice Banded Arcanine into my Togekiss + Jellicent. I predicted the double up into Jellicent turn one, so I switched into Rhyperior. He was unable to regain momentum and lost the set to boosted Rhyperior a few turns later.
R5: Zach Andersen (WLW)
I do not remember much about my set with Zach, but I did write “New Player—BIG THREAT” in the margins of my notepad. If we ever meet again, Zach, I hope I don’t have to play you!
R6: Ahmed Syed (WLW)

Game 1: Ahmed was running what I assumed to be a carbon copy of Edu’s (@MeninoJardim) Galar Weekly Team. Since I was familiar with this composition, I knew that it has few answers for Duraludon in Tailwind. He surprised me with Taunt Hydreigon at some point, but I was able to take the win.
Game 2: We both brought our Trick Room modes which slowed the pace of the game. In a seeming act of divine retribution, he surprised me by self-proccing his Weakness Policy Rhyperior with Ferrothorn’s Gyro Ball and demolishing me in the mid-game. In the final turns, I lacked the resources to knock out his Ferrothorn.
Game 3: I brought Duraludon in hopes of repeating my success from the first game. Since I expected Ahmed to bring Ferrothorn, I also brought Charizard in the back. Though he planned to use Ferrothorn as a win condition, it took a Heat Wave to the face, and I won the set.
R7: Charly Pastrana (WLW)

I have few notes from my set with Charly, but I do remember that this MADMAN used Thunder Wave on his own Gigantamax Snorlax to outspeed my Rhyperior and Jellicent in Trick Room. It was a wild set!
R8: Matt Miller (WLW)


Matt was a new player who used a devastating hard Trick Room strategy to great effect. He led Dusclops and Butterfree every game, and I had to decide whether to Tailwind and Max Lightning while he set up Trick Room or Follow Me the Sleep Powder away. It was a volatile set with momentum swinging wildly as we predicted each other’s moves. Matt Dynamaxed his Torkoal in Trick Room to pressure the team with huge offense, but Jellicent and Rhyperior were able to handle the turtle which enabled me to win games one and three.
R9: Justin Crubaugh (WLW)
Game 1: Justin (@iMagikarpVGC) was playing a balanced team centered around Grimmsnarl and Togekiss. At team preview, I discerned that Justin had little Speed control outside of Thunder Wave or Max Airstream, so I knew I would be able to control the pace of the game if I could get Rhyperior or Duraludon into position. Justin did not make this easy. Though I was able to take game one in a rather decisive manner after making smart plays with my Rhyperior in Trick Room, game two Justin was on a completely different level
Game 2: I prioritized Trick Rooming turn one after learning his Mudsdale and Gastrodon outspeed my Rhyperior. However, Justin punished my Rhyperior switch-in by High Horsepowering a TOGEKISS. Yes, folks, this guy knows how to make a read. He also switched his Gastrodon into a Water Spout which afforded him a Sp. Atk Boost. After he Dynamaxed the Gastrodon, I lost the resources to win.
Game 3: I don’t remember much about this game other than the final position: his heavily damaged Gastrodon and Mudsdale versus my heavily damaged Duraludon and Jellicent. If my Duraludon targets into Justin’s Protect (which was on both Pokemon), he wins the set. To my great fortune, I correctly called the Gastrodon’s Protect and Flash Cannoned Mudsdale for the win.
R10: Cedric Bernier (WLW)
Since I had officially clinched Top Cut with an 8-1 record, I did not have much at stake for round 10. However, when I found out that my opponent was Cedric (@TalonVGC), I was excited to play the guy who, two years earlier, won Dallas Regionals in 2018. Cedric was running a carbon copy of the Gravnosis Team developed by David Koutesh (@HamsterManiaVGC), which had a strong showing at Bochum. I did not write many notes on this set, but I do remember Cedric making some strong plays in our second game using Gyarados and Togekiss. Duraludon + Jellicent worked wonderfully in this matchup and I finished swiss at 9-1!
Top 32: Mitchell Beyer (WW)


Game 1: Mitchell was running a very quirky team with multiple offensive threats augmented by Gothitelle’s trap. I tried to pick a lead that could pressure any of his many options. I chose Duraludon + Togekiss into his Duraludon + Gothitelle. Turn one, he Faked Out my Togekiss as I went for Helping Hand Max Darkness to OHKO his Gothitelle. From that point, my Duraludon (which outpaced his Assault Vest Duraludon) easily took the game.
Game 2: Mitchell led Tsareena and Gothitelle. I assumed that Tsareena would Dynamax, so I Max Wyrmwined that slot as he Helping Hand Max Knuckle’s Duraludon. With the Attack drop, Tsareena did less than 50% of damage to Duraludon. The next turn, Tsareena protected as I Helping Hand Max Darkness his Gothitelle like in game one. He was unable to recover from his positioning, and I took the set.
Top 16: Ryan Schambers (WLL) Scrafty, Tyranitar, Excadrill, Rotom-C, Braviary, Jellicent

Game 1: At team preview, I recognized how difficult this match would be. The Sand duo dissuaded me from bringing Charizard and Whimsicott, so I quickly settled on bringing some combination of Togekiss, Duraludon, Jellicent, and Rhyperior. Thinking he would open up with the Sand mode, I led Togekiss + Rhyperior into his Tyranitar + Excadrill. Using Togekiss’s redirection, I was able to bring eliminate his Dynamax turn two & then safely sweep in Trick Room.
Game 2: Ryan brought out all the tools he had for the matchup! Leading Togekiss + Jellicent into his Rotom-C + Jellicent, I assumed he would reverse my Trick Room, so I switch Jellicent for Duraludon and Yawned the Rotom-C. To my horror, Rotom OHKO’s my Togekiss with a Thunderbolt and Jellicent uses Imprison. My Jellicent would now be useless for the rest of the game. Though I was able to Dynamax Duraludon and recover some of my positioning, I was unable to handle his Excadrill in the endgame.
Game 3: Fearing the lead he used in game two, I decided that leading Duraludon + Whimsicott would allow me to pressure the Rotom-C or the Jellicent while having a slightly negative matchup if he leads the Sand duo again. To his credit, Ryan leads Tyranitar and Excadrill. I decide to Tailwind turn one as he Iron Heads my Whimscicott and Dynamaxes his Tyranitar. I Max Steelspike the Tyranitar (which activates his Weakness Policy) as he Max Knuckle’s me for just over 50% of damage. In retrospect, my better play was Sunny Day—it would have preserved my Whimsicott at 1HP and allowed my Duraludon to deal more damage with Max Steelspike. Turn two, I bring in Jellicent and go for Trick Room. Ryan Earthquakes the field which KOs his own Tyranitar and deals heavy damage to my side of the field, though both Pokémon make it through the turn. From this point, Ryan smartly stalls my Trick Room turns. Though I do get Rhyperior in the Trick Room, I run out of Trick Room turns and his Excadrill, with the Speed advantage, seals the win.
Conclusion and Shoutouts
I believe this team has a lot of potential moving forward—Rhyperior and Jellicent form an incredible duo that are splashable on many team archetypes. Though most players may prefer Conkeldurr as an offensive Trick Room sweeper, Rhyperior was integral to this team’s success. Since many people are familiar with this team composition (since it is similar to Traylor’s six), I would recommend people move away from Charizard and Whimsicott and find other Pokemon which fulfill similar roles.
Shoutouts to Edu (@MeninoJardim) and Alex (@PokeAlex_), who inspired the cores/concepts this team was built upon. Lastly, thank you Justin (@iMagikarpVGC) for helping me navigate my first Regionals top cut!
Finally, thank you to my wonderful wife who accompanied me on this trip and was a huge support throughout the weekend.
Thanks for reading and remember—when in doubt, try adding a little Jelli.